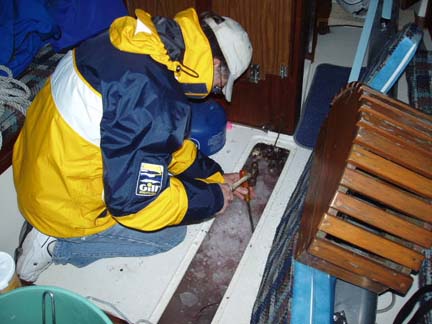
My strange luck...I have a much bigger problem with water in the bilge when the boat is on the hard than I do when we are sailing! This is an especially pesky problem up north here because of the water then freezing in the bilge. This itself is a puzzle to me as I do fill the bilge with a gallon or two of anti-freeze. The water that gets in seems to freeze on top of this anti-freeze. As you can see in the photo below there is about 2 inches of very hard ice on top of this anti-freeze that I had to chip out with hammer and screwdriver. What good is antifreeze if it is just going to sit under the water and not freeze itself but allow a hard freeze above it?
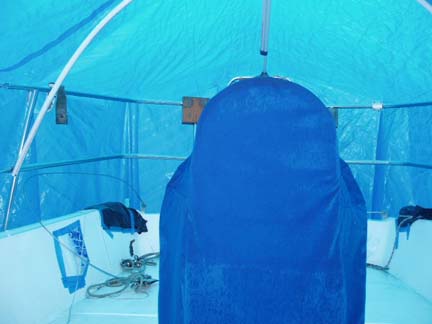
At any rate we now believe that water gets in through the stern locker. The only thing big enough to catch the amount if water we find in the bilge is the cockpit which we had not covered. Water that drains aft on the seats should enter the channel around the stern locker and then drain forward to the cockpit floor and down the scuppers. I think the boat is sitting with a lean that is too far aft so that the water actually goes up and over the channel and into the locker itself. From there it can go around the vent hose and find its way into the bilge. So a better tent type cover for the cockpit was in order. We used 1" pvc pipe, duct tape, and blue tarp to put a complete dome over the cockpit. Hopefully, this will keep the water out! We'll go up and check again after the next hard rain.
Friday, December 31, 2004

Wednesday, December 22, 2004
Update on Planning the BIG Trip
Well, here it is almost Christmas. According to Sue we only have 170 days until we shove off. Many projects are in the works and a few problems have been solved.
INSURANCE - Looks like we've found a solution to the health insurance issue. We've found a company called Lifeboat (no kidding) that caters to cruisers. To get their best deal you have to be out of US waters for 6 months out of the year. We may not get that deal our first year although we will be in Canadian waters for a time as we go through the North Channel. They have a US deal that is a little more but still affordable that will work for our first year. As for insuring the boat itself that is still a question. Progressive Insurance, our current insurer, says they do not insure cruisers but we will talk with an actual person first. Turns out that if you say you are a 'liveaboard' you can't get ANY insurance but if you say you are a cruiser then there are a number of companies. I guess a 'liveaboard' could be someone living on some leaky old barge hanging on an anchor somewhere.
OUR ROUTE - We have decided to take the lake route to the east. We will sail the North Channel of Lake Huron and may take the Trent-Severn Waterway to Lake Ontario. This is our preferred route but as we draw 5.5 feet we are right at the limit of what can be done in this waterway depending on lake levels. If the lakes have another up year as they did last year we may make it. This route takes you from the tip of Georgian Bay all the way to the northern shore of Lake Ontario and thereby skipping Lake Erie entirely. If we can't go this way we will simply head south out of Georgian Bay and go through Detroit, Lake Erie and then through the Welland Canal to Lake Ontario. From there we sail east to Oswego New York, unstep the mast, and get into the Erie Canal. Turn right when you get to the Hudson River and Enee will be pointed south for a long time after that!
Here's a map showing the great lakes...not that far!
http://www.worldatlas.com/webimage/countrys/namerica/greatlk.htm
BOAT PROJECTS - I am currently building new spreaders as you can see by some of the previous posts. Stay tuned for pics of the final versions. We've bought a new alcohol, 2 burner stove that we like but the gimbling that came with was totally stupid. I am building a new cabinet that will hold this little stove and provide storage underneath. No oven! We need space not an oven. I hope to drop the rudder come spring and work on taking some of the play out of it. This is a work in progress and I have more reading and learning to do. We sent a list of desired items to some of the bigger marine suppliers to see if they would like to bid on the list. No response so far.
So, although it is only 5 degrees today spring is just around the corner and this house has to be sold, boat projects completed AND the students will still want their papers graded at the same time. Whew! Hope I live through all this to enjoy the cruising life I've been working toward!
Comparing the Old and New
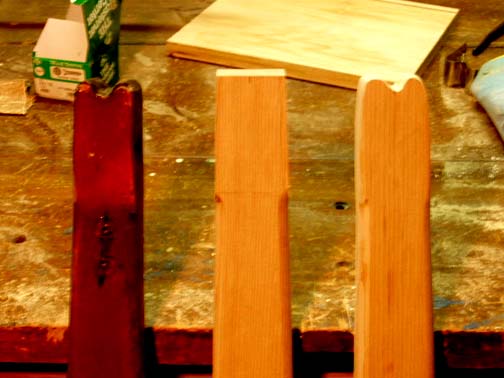
From left to right we have an original spreader (this is the outboard end where the upper shroud goes in the groove and on up to the top of the mast), a new one that has been routed along edge, and a finished one with the groove cut in and final sanding done.

Building New Spreaders
The recent posts around here show some pictures and captions of me building new spreaders for the boat. The originals seem to be structurally sound but were in dire need of refinishing. I hate refinishing wood but do like to build stuff. So, I found out that the desired wood was Sitka Spruce. Neat stuff as it is very straight grain with no knots and yet very light. Exactly what you want up there! The darn things are nearly 4 feet long so I had to build myself a large tapering jig and make many cuts to sneak up on the exact lines I had laid out. All of this method was as directed by the master builder himself...MY DAD! I'm sure he could have done this much better himself but this will have to do.

Subscribe to:
Posts (Atom)